Monday, November 9, 2026
My Garden

This tutorial was written by me on November 9, 2026. The results are of my own imagination. Any resemblance to another tutorial is purely coincidental.
This is an older tutorial that was written in PSP but I converted it to PS. The Resizing is the same in both programs.
Please DO NOT claim this tutorial as your own.
This was written assuming you have a working knowledge of PS.
Please keep in mind that I write the tutorial as I am creating it.
Sometimes I may not explain properly where to place things so please see my example if you are ever in doubt :)
Supplies needed:
I am using Adobe Photoshop 2026 but this tutorial should work with any version.
You can download the 7 day trial of PS here.
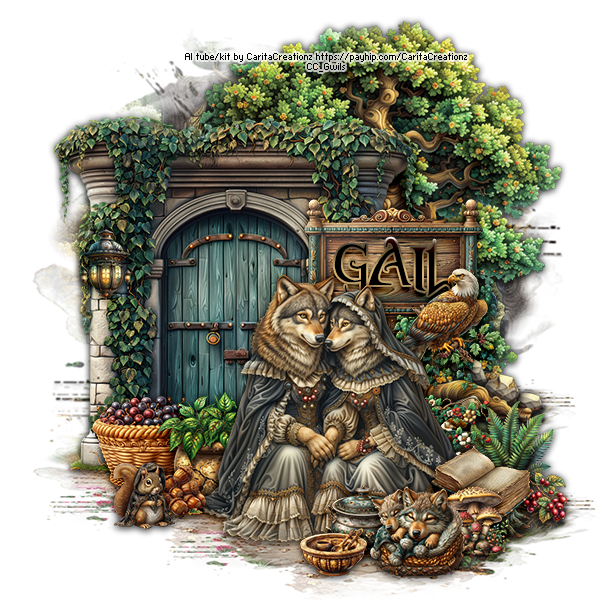
PTU Tube: I am using a beautiful tube called "Joyce" created by Vi Nina. Please do not use this tube without a proper license.
You can purchase this tube at Vi Nina Tubes store here.
PTU Kit: I am using a gorgeous called "My Garden" created by Carita Creationz. This kit is the matching kit for Vi Nina's tube "Joyce". Please note that the tube is not included. You can purchase the kit here.
FTU Mask: Mask 92 by Vivienne's Paintbox. Thank you for your awesome masks. You can download it from her blog here.
I am using the png versions for this tutorial.
Font of choice for your name.
Plug in: None
Drop shadow of choice.
Please read all the Artist's/Designer's TOU.
Notes:
I use the CTRL + T command for resizing and rotating.
To mirror or Flip go to Edit>Transform>Flip Horizontal (mirror) or Flip vertical (Flip).
Don't worry about the drop shadow as I add it at the end of the tutorial.
Remember to save often.
Let's get started.
Open a new 850x850 transparent image. We will resize later.
Add a new Raster layer.
Go to layers, new fill layer, solid color. When the pop-up window appears type in FFFFFF and click ok.
Open Mask_Vivienne_0092 in PS – Left click the mask layer in the layer pallet ( Layer 1) and drag it directly into the tag.
Hit Ctrl + T on your keyboard. On the top of PS click the link between the W: and H:. Resize 95% and click on the check mark on the top right of the bar.
Click on image to enlarge it.

Open paper of choice. I am using paper 3. Open in PS and drag it directly into your tag. (same steps as above). Right click on the paper layer and select Convert to Smart Object. Resize 70% and move over the mask. Right click on the paper and select Create a Clipping Mask. Move the paper layer until you are happy with the placement.
I will be using this method for all the elements in the tutorial. Open element in PS. Left click Layer 1 in the layers pallet and drag it directly into the tag. Right click on the element and select Convert to Smart Object. I convert all my elements, papers, frames and tubes to a Smart Object as I find it keeps the image crisp and you don't have to sharpen the item after resizing.
Hit Ctrl + T on your keyboard. On the top of PS click the link between the W: and H:. Resize 95% and click on the check mark on the top right of the bar. I will be using this technique for resizing all the elements and papers.
Element 10 – Resize 40%, move to the upper right of the mask.
Element 8 – Resize 54%, move to the lower left of element 10.
Element 17 – Resize 15%, move to the lower right of element 10.
Element 11 – Resize 13%, move to the lower right of element 17.
Element 12 – Resize 10%, move to the lower left of element 11.
Element 53 – Resize 35%, move to the top right of element 8.
Element 43 – Resize 15%, mirror and move to the bottom right of element 8.
Go to Edit>Transform>Flip Horizontal (mirror).
Element 4 – Resize 40%, move to the bottom of element 12. See my example placement.
Vi Nina’s tube - Open the tube in PS. Select the full size tube and drag it into your tag. Close the original. Select the tube layer, right click and convert to smart object. Resize 30%. move between element 4 and element 8.
Element 01 – Resize 15%, move to the bottom right of the tube.
Element 05 – Resize 35%, move to the bottom left of element 8.
Element 02 – Resize 20%, move to the bottom right of element 8.
Element 18 – Resize 20%, move to the bottom right of the tube.
Element 16 – Resize 15%, move to the bottom left of element 18.
Element 37 – Resize 20%, move to the bottom left of the tube.
Element 21 – Resize 17%, move to the bottom right of element 02.
Element 40 – Resize 15%, move to the bottom right of element 37.
Element 30 – Resize 15%, move to the bottom right of element 21.
Element 32 – Resize 10%, move to the bottom left of element 30.
Element 28 – Resize 10%, move to the bottom right of element 30.
Element 15 – Resize 17%, mirror and move to the bottom right of the pail.
Element 51 – Resize 20%, move to the bottom left of the pail.
Element 14 – Resize 15%, move to the bottom of element 51.
Element 39 – Resize 7%, free rotate to the right 15 degrees. Move to right middle of element 10.
Click on image to enlarge it.

Duplicate, mirror and move to the top of element 8.
Element 58 – Resize 15%, move to the bottom left of the lantern.
Add any other elements or make any adjustments you would like on the tag.
Time for some Drop Shadow.
Select the element on the bottom of your tag in the layer pallet and double click it.
It's layer 4 on my tag.
A layer style window will pop up. Click on Drop shadow. and use the following settings:
Click on image to enlarge it.


Now right click on the layer you just applied the drop shadow. Click copy layer style.
Now click on the layer above and hold down the shift key, click on the top layer. Right click and paste layer style. Drop shadow complete :)
Crop away any extra space and resize your tag if you like.
Add your copyright and name.
Hide the white background layer.
Save your tag and export as png.
Go to File>Export>Save for Web and use the following settings:
Click on image to enlarge it.

I hope you have enjoyed my tutorial.
Subscribe to:
Post Comments
(Atom)
My Blinkie


I CT for



Favorite Stores














Sites I visit






































0 comments:
Post a Comment